Author Topic: After the shot  (Read 2427 times)

After the shot
on: December 05, 2010, 02:11:18 AM
I know a lot of people adjust the images they shoot
I dont usually tend to do more than crop them

I have set my cam to shoot raw+jpg now and got adobe lightroom 3

Just having a quick look at exposure and white balance

What else should i be looking at to make my images better?

Re:After the shot
Reply #1 on: December 05, 2010, 02:29:44 AM
Really depends on what you want to do to your image, if you just want to fix stuff, or add a bit of a style to it...

Recovery can sometimes be useful to get a bit more of an even shot, there are noise reduction settings, even lens distortion corrections, however you can use it a lot more than that, you can create filters and masks, tweak colours etc etc...

To be honest just play round with the settings, maybe have a look at a few guides on the net.

Also have a play with the presets, not always to actually use them, but to see what settings they have changed to achieve an effect.

But just dont go to mad with it, you can make some pretty terrible pics when you take it too far, but at the same time you can take some really good ones, most I give at least a very slight tweak, and I also find the management very good. i.e. you can rate pictures using the number buttons, x flags a picture for deletion, and you can apply filters to show different flagged levels, to 5 are my final images, 3 are ones that make the short list, 1 are ones that wont..

  • Offline zpyder

  • Posts: 6,946
  • Hero Member
Re:After the shot
Reply #2 on: December 05, 2010, 10:36:12 AM
I never got my head around Lightroom when I was forced to use it after upgrading my camera. Thankfully Camera Raw + photoshop seems to have sorted itself out now.

However Lightroom uses camera raw and most of the settings I used in CR were in lightroom in develop. The things I tend to look at are the white balance, I tend to go down the following list clicking things to see how they look and either leaving them as is or making a change and moving on:

WB - I click it from as shot to auto, most of the time it makes the image look a little better, but sometimes it makes it look a lot worse, EG the snow shots came out bluer than shot. However for the snow shots I still tweaked manually by shifting the scale bar to the left a little bit which made the snow whiter (it was a little grey)

Camera Raw then has 2 button for "auto" and "default" I tend to see what CR thinks the image should look like and click auto, and then default and toggle between as Xenity said to see what changes were being made.

It tends to be 50/50 where Ill use auto or default and then tweak the things that were changed to either highlight something or reduce how severe auto might be.

The things that get toggled are exposure, recovery, blacks, brightness...and recently, clarity.

I tend to leave recovery however as it tends to make an image a little bland, and Ive not used fill light. Clarity seems to be a sharpening tool.

After the shot
Reply #3 on: December 05, 2010, 11:07:37 AM
I use photoshop & CR, pretty much the same as whats been said already.  The Auto feature in CR is usually quite good as a starting point.  But usually just a case of plugging in some arbitrary values and if it doesnt look right adjust it by +/-10 and see what thats like until you end up with something that your happy with.  Guess the same principle works in Lightroom (Ive only used it a little, didnt like it much so stuck with photoshop)

After that once its in Photoshop itself just a quick bit levels, contrast/saturation and then Unsharpen mask, add a border and thats about it really.

Just have a play around really, changing some things doesnt work on some photos so try and use a range of different shots of different things and youll soon see what works.

  • Offline zpyder

  • Posts: 6,946
  • Hero Member
Re:After the shot
Reply #4 on: December 12, 2010, 15:54:38 PM
This one was processed fairly heavily today. I basically left the camera outside with the remote on in the hopes of catching some birds on one of the feeders, and got lucky. However as Id left everything in P mode and the lighting in the garden wasnt too hot the exposure was pretty bad. I decided to give the HDR from a single Raw image suggestion made in an earlier thread a go. I changed the white balance to auto and then saved about 4 different copies of the image at about .5 increments to exposure.

I opened up PS and used the merge to HDR command, selected the images and ran it. The highest exposure image turned out to over-expose the whole thing, but when I deselected it I got the resulting image, and also I tried a noise reduction process to denoise due to a highish ISO being used to catch the wildlife in the act.


Robin redcrest by Chris_Moody, on Flickr

After the shot
Reply #5 on: December 12, 2010, 16:00:38 PM
thats pretty cool

  • Offline BigSoy

  • Posts: 1,353
  • Hero Member
  • They sicken of the calm, who knew the storm.
Re:After the shot
Reply #6 on: December 12, 2010, 16:51:50 PM
Lovely sharp shot Zpyder - was that cropped or full frame?

Binary - if youre processing from raw in lightroom youll want to look at sharpening too as the RAWs generally look pretty soft in comparison to a pre-processed JPG. A few different ways to do this, some good guides available on the web.

Worth playing with some of the preset templates, punch etc to see what difference different types of processing.

To me, when I see amazing post processing on a photo, thats as much a great skill as taking the photo in the first place and all part of a photographers arsenal in creating a great image. And there are some truly stunning examples out there.

A couple of my favourite processed shots:
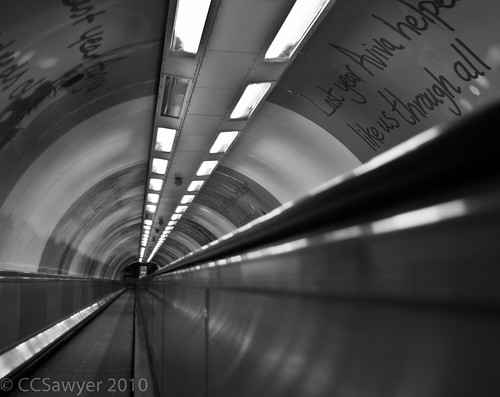

Going home... by CCSawyer, on Flickr


"Within your 'purview'? Where do you think you are, some f**king regency costume drama? This is a government department, not some f**king Jane f**king Austen novel!"

  • Offline zpyder

  • Posts: 6,946
  • Hero Member
Re:After the shot
Reply #7 on: December 12, 2010, 17:21:26 PM
Quote from: BigSoy
Lovely sharp shot Zpyder - was that cropped or full frame?


Cropped, and then shrunk down a little too. Im finding the nearly 2x greater MP on the 7D (compared to the 400D and 40D) very useful. Id say image wise the full frame is about 2x as wide as the posted one and about 1/2 as high again. Un-shrunk the image below was still about 2600x pixels wide :D

It was using the 19 point autofocus. I think theres a bit of a trade off there as I find the 7Ds normal shutter sound very very loud, certainly the camera triggering approx 1.5m from the birds is enough to scare them off. I tried putting live view on for silent shooting which probably halves the volume, but then spent about 20 mins sat in the dining room half triggering the camera every 3 mins to make sure the live view didnt turn off. Of course using live view meant the autofocus is totally pointless for wildlife, so I was also then using manual focus ><

0 Members and 1 Guest are viewing this topic.