Author Topic: Tek photo guide Wiki  (Read 2675 times)

  • Offline Alien8

  • Posts: 467
  • Sr. Member
Tek photo guide Wiki
on: June 16, 2008, 15:05:38 PM
leading on from mrt post about the  Telegraph doing a mini seris on photography advice I thought we could make our own by posting tips that we have seen or used etc.


would be good if tips are kept on tek rather than just a link


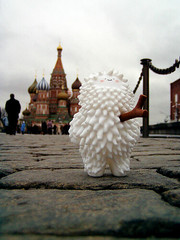
(none of photos below are mine, most are clicky to original location)

Rule of thirds

As our eyes like space to move placing an object away from the middle can greatly improve a photo, if you can imagine a tic-tac-toe grid over the image and place on one of the lines, this is the Rule of thirds (Rot)
Centered Vs Rule of thirds
 

Same applies to the horizon, if its  a 50-50 line across the frame it can make photos look bland fill placing the division 1/3 or 2/3 gives a more natural look
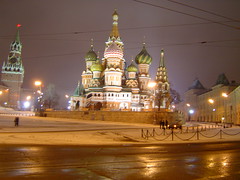
Go lo, or High for a new view

We all see the world from with in about one and a half foot of each other due to eye level, so we tend to think of it as mundane,  puting the camera low or high changes a view you are used to into a new scene
Standad Vs Low Level


Leading lines

I leading line can take you into the frame, make you look at a object,


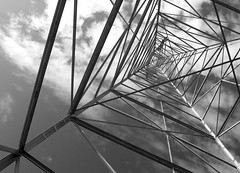
in the above notice that your eye is drawn up the frame, or along the wires to the top of the pylon (note the top is a rule of thirds point)


not only drawing water, it draws the eye


Too much in or, no Focal object

Photos should try to have a single object to look at making one thing the main attention of a photo can help it look far better

looking at the train or the people?

almost no question here though


Danger in Red
Due to the way our eyes see red, red can be a very strong element of a photo. Our eyes have to re-focus to see a red object, this is subliminal.
When a strong red object is in a photo it will draw the eye, this can be used to emphasize a point, like in schindlers list, but if it can be a distraction

do your eye drift to the side?


Combination of Red and a leading line.


Notice in the third picture the gravity the red fence and girls pants have compared to the tree or the man in front of the blue door


Leaky Pictures


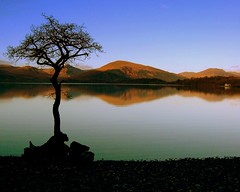
check you horizon is level, even one or two degrees out can make water look like its about to poor out the side of your screen

Nice and Level at loch lomand


DSE Falls


please add any tips you can think of too


tek photo guide Wiki
Reply #1 on: June 16, 2008, 17:01:41 PM
If I install mediawiki or something similar youd be welcome to use it properly for a wiki, that said you can get "free wiki"s online now.

Re:Tek photo guide Wiki
Reply #2 on: June 19, 2008, 08:43:39 AM
It would be nice to see a guide as to how to actually use a camera properly, for things like the apeture sizes, f-stops and iso/asa numbers.
Ive got a couple of SLRs (A Fujica STX-1 and a Canon Eos Rebel) I wouldnt mind knowing how to use.

  • Offline Alien8

  • Posts: 467
  • Sr. Member
Re:Tek photo guide Wiki
Reply #3 on: June 19, 2008, 12:58:35 PM
What is Aperture or a  f/N stop?
The aperture is a fraction of the focal length divided by the size of the hole light passes through before hitting the film or sensor
this is often expressed as an f stop such as f/1.8 or f/5.6

what does it does it do?
It does two things
1. it restricts the amount of light hitting the film or sensor
2. it restricts what is in focus

why restrict the amount of light, isnt more better?
For a photo to be properly exposed sometimes too much light is bad and will result in a white image, if a lens only had one aperture  then the only way to control exposure would be shutter speed to a different ISO setting or film.
…faster shutter speeds are harder to archive so cost more to make
…Faster ISO will mean more noise or grain on the image.

why restrict the focus?
A lower number aperture reduces the area that will be in focus but a higher number such as f64 will have almost everything in focus.
the control of the area of focus, also known as "depth of field" which is abbreviated to DoF, allows for artistic and aesthetic control of the frame.

Does aperture do any thing else?
the shape of the hole the light passes though in the lens can effect the picture, this is best seen in films where the night scenes have lights in the distance, if the aperture shape is round they will be circular if its hexagonal, they also are hexagonal, some  lensbabies for SLR systems have pre shapes disks such as the dollar, harts to take advantage of this, it also effects the out of focus areas that dont show as obviously and is often called Bokeh

  • Offline Alien8

  • Posts: 467
  • Sr. Member
Re:Tek photo guide Wiki
Reply #4 on: June 19, 2008, 13:18:34 PM
What is ASA DIN and ISO?
in Photography ASA, Din, GOST and ISO are all names for standards defining the sensitivity of a film, for a digital sensor only ISO is usualy used  .

Sensitivity of a film?
Sensitivity is how much light the film or sensor can recored in a given time.
less-------------------------------------------------------->More
25, 50, ,100, 200, 400, 800, 1600, 3200, 6400, 128000, etc

as with a lot of photography its its doubles and halves for example

assuming same shutter and aperture for all ,  a 1 second exposures at ISO 100 is equal to the following…

ISO 25 =  4 sec
ISO 50 = 2 sec
ISO 200 = 1/500th
ISO 400 = 1/250th
ISO 800 = 1/125th
ISO 1600 = 1/60th

  • Offline Alien8

  • Posts: 467
  • Sr. Member
Re:Tek photo guide Wiki
Reply #5 on: June 19, 2008, 13:40:53 PM
what is the Auto, P, A, S, M, Tv & Av? and what do they do (camera dependent)

beginner modes

Auto
you camera does almost every thing for you other than aim and click the shutter release

P mode
this is a slightly advanced version of Auto, allows control over ISO and some allow the user to select which version of the correct exposure they wish f/4 @ 1/125 or f/5.6 @ 1/60th of a sec.

Normal modes

A & Av
this allows you to tell the camera what aperture you want to use and the camera will work out the shutter speed to allow for what it meters to be the best exposure
ideal for…
portraitures where you set the aperture to a low number f/3.5 or lower
Landscape where you set the aperture to a med to high number f/11 or higher

S & Tv
this allows you to tell the camera what shutter speed you want to use and the camera will work out the apurture to allow for what it meters to be the best exposure
ideal for…
freezing fast moving objects such as cars, bikes or children
blurring slow moving objects or the milky effect water gives at 1 sec or more

In both the above the camera will try to get a good result but if it does not have a shutter that is fast/slow enough or an aperture that can open/close to the right size you may still get over and under exposed images

advanced modes

M

full manual mode, you select shutter and aperture size, probably the setting you will lern faster and more using. not as dounting as it might appear, as once you decide the type of shot you wish the other is adjusted to suit your taste.

  • Offline Alien8

  • Posts: 467
  • Sr. Member
Re:Tek photo guide Wiki
Reply #6 on: June 19, 2008, 13:55:49 PM
ISO Vs Shutter speed Vs Aperture

ISO, Shutter speed & Aperture are all related to each other in deciding the exposure

all the shots below have the same exposure value.

ISO same, Aperture & Shutter speed change

100@f/1.4@1/125
100@f/2@1/60
100@f/11@1/2

Aperture same ISO & Shutter speed change
100@f/1.4@1/125
400@f/1.4@1/500
1600@f/1.4@1/2000

Shutter speed Same ISO & Aperture change
100@f/1.4@1/125
200@f/@2/125
800@f/4@1/125


every time you double one of the three (ISO,  Shutter speed or Aperture)  half one of the remaining
every time you halve one of the three (ISO,  Shutter speed or Aperture)  double one of the remaining


[edited for correction as pointed out by jamieL :D]


Re:Tek photo guide Wiki
Reply #7 on: June 19, 2008, 14:21:06 PM
Quote from: Alien8
ISO Vs Shutter speed Vs Aperture

every time you double one of the three (ISO,  Shutter speed or Aperture)  half one of the remaining
every time you halve one of the three (ISO,  Shutter speed or Aperture)  double one of the remaining


this is exactly correct, but could confuse some beginners because of the way aperture stops are often written down.

It is important to remember that the f/ number is actually the denominator of the fraction, so 1/1.4 > 1/2 > 1/2.8 and so on.

  • Offline Alien8

  • Posts: 467
  • Sr. Member
Re:Tek photo guide Wiki
Reply #8 on: June 19, 2008, 14:42:16 PM
its a good point but there doesnt seem to be an easy way to express an f-stop

just for compleateness
Full stops
half stops

1   1.2   1.4   1.7   2      2.4   2.8   3.3   4      4.8   5.6   6.7   8      9.5   11   13   16   19   22   32   45   64   90   128


Re:Tek photo guide Wiki
Reply #9 on: June 19, 2008, 19:51:29 PM
This is good stuff guys and actually makes sense! Actually learning how to use my new camera properly! (Only a very amature photographer at the moment)

Can someone sticky this?.... Ill delete this post if you want to clear this post of random crap :)

    • Leons Lost
  • Offline Leon

  • Posts: 3,154
  • Hero Member
  • Bah Humbug!
Tek photo guide Wiki
Reply #10 on: June 19, 2008, 23:52:29 PM
Great work guys, enjoying reading and making sense to me :) keep em coming :)
.::. www.leonslost.co.uk .::. Media Server Guide .::.

PC: i5 760 .::.  GA-P55-UD3 .::. 8GB Corsair 'Dominator' DDR3 .::. 1GB EVGA GTX 460 SC .::. Win7 Ultimate  .::. Dell 24" Ultra Sharp
Netbook: HP Mini 311c-1101sa .::. 3GB Ram .::. ION Hack .::. Win7 Ultimate
Server: HP MicroServer .::. 3GB Ram .::. 4x 2TB Storage .::. 512MB nVidia 210 .::. Win7 Ultimate, XBMC 11 (Aeon NOX), Sick Beard & Couch Potato
Phone: SE Xperia Mini Pro .::. MiniCMSandwich Lite (Android ICS Custom) .::. OC @ 1.6Ghz
Tablet: Asus Transformer TF101 w/ Dock .::. EOS JB Nightlies (Android JB Custom) .::. OC @ 1.6Ghz

  • Offline Alien8

  • Posts: 467
  • Sr. Member
Re:Tek photo guide Wiki
Reply #11 on: June 23, 2008, 23:59:10 PM
just noticed these on the hard drive from When I got my 50mm and was playing

Quick Visual aid to Depth of field

starting with a low f stop (big hole)
ending with a high(ish) f stop (small hole)


f/1.7

f/2

f/2.2

f/2.5

f/2.8

f/3.2

f/3.5

f/4

f/4.5

f/5

f/5.6

f/6.3

f/7.1

f/8

f/9

f/10

f/11

f/13

f/14

f/16

f/18

  • Offline Serious

  • Posts: 14,467
  • Global Moderator
  • Hero Member
Re:Tek photo guide Wiki
Reply #12 on: June 24, 2008, 14:32:55 PM
With a digital camera dont just take one picture of things, look around, change your position, think of where you want to take the picture from. This can help eliminate stuff like telegraph poles and waste areas but also might lead to better composition.

Take lots of photographs, they cost nothing with a digital camera and even if you ditch most of them it adds to your experience.

The rule of thirds works, but not always, usually good with buildings and built up areas. You can also use it sideways, third sky, third foreground, third background, this breaks the area up into nine squares, like an oxo grid. Some cameras have the option of putting a grid on their screen to show this during live view. Some SLRs have a replacement screen for it, worth asking about. It works much better on larger images than little ones. When you are taking a portrait use think of using two thirds, right or left, for the subject.

Think before you take a photo of someone looking straight at the camera, often getting them to face very slightly off slightly to the side improves the shot.

Use fill in flash if your subject is backlit, or take multiple pictures and combine them so the lighting is right.

Dont use a flash setup thats too low, it should be above the lens. For that matter dont photograph someone from a low level unless you want to look up their nose.

Just because a woman looks pretty to you doesnt mean shes photogenic.

There are plenty of people about, men included who are suitable for being a model, dont leave them out.

Use a long telephoto lens for taking candid photographs of people, the further away from them, within reason, the better. I found this out with my mother who hated anyone taking her photograph, she wouldnt relax. The best photos of her were when she didnt know you were doing it.

  • Offline Alien8

  • Posts: 467
  • Sr. Member
Re:Tek photo guide Wiki
Reply #13 on: June 24, 2008, 16:03:31 PM
this post is from Mongoose that he posted in Canon lensesthread,  I added the Sony Minolta info and is marked with an * at the end

Quote from: Mongoose


They can be very confusing for those who dont know, here are some catagories and their names where I know them (perhaps we could make a sticky?)


Top tier glass, usually with all the trimmings, built like tanks to survive pro-use

Canon - L
Pentax - * (the * is appended to the range name, so FA* and DA* are each the top of their respective ranges)
Sigma - EX
Tokina - AT-X
Tamron - SP
Sony/Minolta - G (for gold standard) *

In lens sonic motors, gives faster, quieter AF
Canon - USM
Nikon - AF-S
Pentax - SDM
Sigma - HSM
Sony/Minolta - SSM *
uses clever glass to deal with CA
Pentax - ED
Sigma - APO
Tamron - LD
Sony/Minolta - APO (IIRC) *

Crop sensor digital only designed for ~1.5x crop sensor cameras, vignetting will occur with film cameras
Canon - EF-S (cannot be mounted on full frame cameras due to shortened mirror box)
Nikon - DX
Pentax - DA
Sigma - DC
Tamron - Di (Tamron only seem to have one designation for digital optimised lenses, for both full and crop frame)
Tokina - DX
Sony/Minolta - DT *

Digital Optimised Coatings, improved lens coatings to cope with increased reflection from digital sensors. Still projects full image circle for film cameras and full frame DSLRS.

Pentax - DFA, (also some DA* lenses actually project a full image circle)
Sigma - DG
Tamron - Di (Tamron only seem to have one designation for digital optimised lenses, for both full and crop frame)
Tokina - D

distance-encoding device  enables improved calculation for flash exposure

Sony/Minolta - D *

Those are all the ones I can think of off the top of my head, any specific queries give me a shout. Im best at Pentax and 3rd party lenses but have hung out with enough Nikon and Canon togs to have a vague idea on those too.

  • Offline jamieL

  • Posts: 641
  • Hero Member
Re:Tek photo guide Wiki
Reply #14 on: June 27, 2008, 22:22:42 PM
Quote from: Alien8
ISO Vs Shutter speed Vs Aperture

ISO, Shutter speed & Aperture are all related to each other in deciding the exposure

all the shots below have the same exposure value.

ISO same, Aperture & Shutter speed change

100@f/1.4@1/125
100@f/2@1/250
100@f/11@1/15
[/color]

Aperture same ISO & Shutter speed change
100@f/1.4@1/125
400@f/1.4@1/500
1600@f/1.4@1/2000

Shutter speed Same ISO & Aperture change
100@f/1.4@1/125
200@f/@1/125
800@f/.4@1/125


every time you double one of the three (ISO,  Shutter speed or Aperture)  half one of the remaining
every time you halve one of the three (ISO,  Shutter speed or Aperture)  double one of the remaining


Am I right in thinking this is wrong? Surely using f/2.0 compared to 1.4 would need a longer exposure than a shorter?


A great read here :) Everything is short, straight to the point and informative! Im also tempted to make an animated GIF out of that example of the different aperatures..

0 Members and 1 Guest are viewing this topic.